Saturday, November 28, 2009

Merry Christmas Card

I just love this Penny Black set of Christmas stamps - the wonder. You can purchase the set here at my store. I embossed and coloured one of the images from this cute set on this card. I used my tombow pens and prismacolor pencils to colour. I then used a Stamp-it stamp 2147D Hip Christmas for the greeting and finished it all off with some festive metallic ribbon and a gold star brad.

Thursday, November 19, 2009

Penny Black Christmas Card

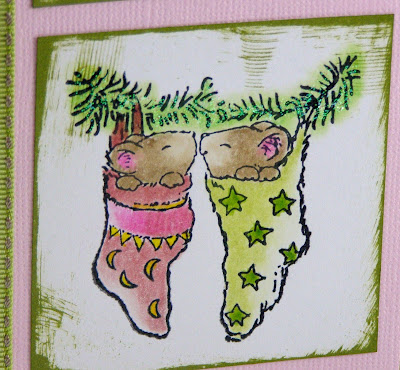
The stamps used in this card are from the Penny Black transparent stamp set: the wonder... available here on my website. I just love this collection of stamps. Cute and versatile. I stamped the sentiment with Distress Ink - Peeled Paint and the little mice in the stocking with a jet black ink and then embossed it.
I coloured this image with prismacolor pencils and tombow pens and finished it all off with some kindy glitz glitter on the branch.
I really like the colours in this card - pink and green bazzil card and a matching green stitched ribbon and pink star brad.


Sunday, September 27, 2009

Paperkins


Just listed some cute paper piecing paperkins dolls from EK Success at my store - warmheart craft. They are not in production any longer so I will not be restocking these. They are quite rare and are collectables. They are acid and lignin free so make great scrapbooking embellishments. Check them out in my papercrafts section of the store.

Tuesday, September 1, 2009

Baby Shower Card


This pretty card is for a baby shower - the whole image is one stamp from SonLight Impressions - G8 1029.P2 coloured with tombow and copic pens and highlighted with Kindy Glitz. I stamped the image twice and cut out some of the smaller pictures to raise with mounting tape. It has been made on a large 14cm square lime base card and matted with a darker green card. I also used the darker green card on the side to make a rectangle base for the yellow satin ribbon.


You can purchase this card from my store.

Friday, August 28, 2009

Colouring Video

Hero Arts posted this great video tutorial on colouring.

Saturday, August 8, 2009

Twins Birthday Cards


These are the cards I made for the twin's birthday. Stamped with Craft Creations Happy Birthday stamp. The background paper is from Me & My Big Ideas - Live Creatively range. I embossed the large monogram letters with the circle embossing folder from Cuttlebug. I used a circle theme on these cards with the choice of background paper, the little circle photo and the circle embossing folder.


Penny Black Happy Birthday Card


Another Penny Black handstamped card - Birthday Best. Stamped, embossed and coloured with tombow pens. The background white card was first stamped with Lucy's Stamps - Happy Birthday 863Le Birthday. The outside of this background card was then distressed by rubbing a lilac ink pad around the edges and then it was embossed in a Cuttlebug embossing folder. I then stuck on the plain fuchia pink mat and a beautiful textured purple velour ribbon with double sided tape before adding the top stamped and coloured Birthday girl. I used Kindy Glitz to highlight the small pink frame and the candles on the cake.


You can purchase this pretty card from my store.

Penny Black Thank you card


This cute thank you card has been handstamped and embossed using Penny Black - A Gift Of flowers 586K stamp and Papercraft Clear Cling stamps - Sentiments. The white background was first distressed by rubbing a yellow ink pad around the edges and then embossed with a Cuttlebug Embossing folder. I also distressed the edge of the small Papercraft thankyou card with a pale blue ink pad. The daisy punch outs were raised using mounting tape and I embellished the centres with clear Kindy Glitz. I also outlined the pink border of the Penny Black stamp with Kindy Glitz.

You can purchase this card from my store.

Saturday, July 18, 2009

Heartfelt Wishes Window Card

This card has been stamped with Hero arts H1107 Wood mounted Sunflower Gal and CL272 All Occasion Clear Stamps. I also used a cream DL window card.


  • Stamp the Sunflower gal stamp twice onto YES Card with black ink and emboss with clear powder. I prefer this YES Card for stamping and colouring images. It has a nice smooth surface and allows blending of the coloured pens with water. Click on the link to purchase. Colour one image completely and only colour the flowers of the second image. I used tombow pens to colour. Refer to pic for colours. Cut out the coloured parts and put aside.
  • Stamp Heartfelt Wishes onto a 1.5x5cm piece of YES Card and emboss as before. Run the blue pen used to colour the dress of the gal around the outside edge of the little stamped rectangle. That helps to tie your colours together.
  • Now for the window. Cut 3 pieces of jute string - about 10cm lengths. Cut a piece of acetate about 7cm square. Stick the acetate over the window on the front of the card. Then stick down the string - 2 diagonally and 1 horizontally. refer to the pic.


  • Next sew an 18mm wooden button onto the centre of the acetate - where the jute crosses. I used black DMC floss and a needle. Leave some of the floss loose as in the pic.
  • Cut some hessian. 10x6cm piece and 8x3cm piece. Fray the edges a bit and stick it to the black overlay of the window card. Use doublesided tape.
  • Then sew around the inside edge of the stuck on hessian pieces with a sewing machine. Use black cotton and a zigzag stitch.
  • Stick the overlay to the main card with double sided tape.
  • Refer to the pic for placement of the stamped images. I used craft glue to stick them down flat on the hessian and then magic mount to raise up the flowers on the basket and in the gal's hair.


Bear Hugs to you Card

This card has been stamped using Printblocks bear Hugs stamp and Old Bear Large 904LK from Lucy's stamps.
Start with a standard A5 black card and a 10x14cm piece of light brown decorative paper.
  • Distress the edges of the paper by rubbing Walnut Ink Stain Distress Ink Pad around the outside edges.

  • Stamp the Large Old bear stamp with this ink onto a cork paper sheet and emboss. Cut out.

  • Then stamp "bear hugs" with the same ink onto the end of a medium tag. Distress the edges of the tag as you did before. Run the tag through a Cuttlebug embossing folder to give it the wrinkled appearance.

  • With double sided tape, stick on a piece of brown plain ribbon and then a piece of brown ric-rac onto the other end of the tag. Refer to the pic.

  • Tear a piece of contrasting brown decorative paper about 2x13cm. Distress the torn edge and using the double sided tape, stick it to the top of the 10x14cm piece of decorative paper mat.

  • Next stick the cork bear on the right side of the card. I used craft glue.

  • Using double sided tape, stick on the tag. Slip the top of the tag just under the bear's paw.

Most of the supplies are available from our store.

Hello Friend Thankyou Card

Stamps used in this card are from Hero Arts - CL290 printed Flowers and CL272 All Occasion Clear Stamps. Another card designed for the Hero art Challenge
Start with a standard A5 brown card base.

  • Cut a mat from decorative postal themed paper 10x14cm.
  • Stamp Hello friend from the Hero Arts CL272 All occasion clear stamps in the bottom right corner of the 10x14cm of postal paper. Use Walnut Ink Distress Pad.
  • Stick a piece of scrap distressed paper down the left side - see the pic.
  • Stitch a zig-zag stitch on the sewing machine vertically down the card twice. Use a dark thread and refer to the pics for placement.
  • Stamp and emboss three flowers from the CL290 Printed Flowers stamps onto scraps of brown card and cut out. Put a brown heart brad through the centre of the largest flower.
  • Position the flowers on the decorative mat - see pics again. Glue into place.
  • The postage stamp was cut from a piece of scrapbooking paper but a real stamp looks good too. You can purchase packs of old stamps cheaply from stamp collectors. Stick in place with magic mount.
  • Make an insert from Yes Paper and stamp a flower on the bottom right corner with the Antique Linen distress Ink Pad.

You can purchase this card already made from my store and on etsy.

I Appreciate You Distressed Thankyou card

This card was made using Hero Arts CL290 Printed Flowers and CL272 All Occasion clear stamps. Another card designed for the Hero arts weekly challenge.


Made with a brown craft card base - standard A5 size.


  • Start with a dark chocolate mat 10x14cm, four 3cm squares cut from the brown craft card, four 4cm squares cut from a sandy brown card and an 8.5x4cm rectangle also cut from the sandy brown card.

  • Distress the edges of the 3cm brown craft card squares and the rectangular sandy brown card by rubbing the edges along a Walnut Ink Stain Stamp Pad.

  • Glue the small 3cm squres to the centres of the sandy brown 4cm squares.

  • Stamp the flowers from the Hero Arts CL290 Printed Flowers Clear Stamps onto different coloured brown card scraps using the Walnut Ink Distress Pad. See the pic for colour and design choice. Cut these out and set aside.
  • Stamp the three messages fom the Hero Arts CL272 All Occasion Clear Stamps onto the rectangular sandy brown card, once again, use the Walnut ink pad.
  • Now align the small squares and the stamped rectangle on the large dark chocolate mat. Refer to the pics. Glue into place.
  • Centre four of your cut out flowers onto the small squares and stick in place with magic mount.
  • Add black pearls to the centre of the top right flower and the little stamped flower on the message.
  • The insert has been cut from Yes Paper and lightly distressed around the edges with the Walnut Ink stain stamp pad.

You can purchase these cards already made from our store.

Distressed Thankyou Card

This card has been handstamped using Hero Arts CL290 Printed Flowers and CL272 All Occasion clear stamps. I designed this card for the Hero Arts challenge this week.


  • First I made a 14cm cream base card and distressed the edges by rubbing them along a Walnut Stain Distress Ink Pad.
  • Stamp "Thank you very much" with the same ink pad onto the same cream card. Trim and distress the edges in the same way.
  • Make a mat for the stamped message from chocolate card and stick together with double sided tape. Also cut a mat 12cm square from the chocolate card and set aside.
  • To make the distressed background, start with a piece of decorative handwriting paper and stamp flowers over it using the watercolour technique. Ink up the stamp with Antique Linen Distress Ink and before stamping, spritz it with water. (Use a fine mist spray bottle)Randomly stamp over the decorative paper.
  • When dry, crumple the decorative paper up into a small ball and then gently unfold it and flatten it out as much as possible. Rub the Walnut Stain Distress Ink Pad gently over the crumpled paper to get those dark cracks and highlights. Then tear the edges so that you have about a 11x10cm piece and adhere to the large chocolate mat you put aside with double sided tape.
  • Zig-zag stitch along some of the edges with a sewing machine.
  • Next get a large cream flower and rub the Walnut Stain Distress Ink Pad over it.
  • Stamp the Thankyou printed flower stamp with the same distress ink onto mustard card and cut out.
  • Stick a piece of decorative ribbon along the bottom edge of the large chocolate mat - see the pics for placement. Use double sided tape and tuck the edges to the back.
  • Now layer the flowers and place them on the card mat. Secure them in place with a large chocolate brad.
  • Position the stamped and matted "Thank you very much" and stick in place with magic mount.
  • Distress the card insert with the Antique Linen Ink Pad. I used Yes paper and gently rubbed the ink pad all over it.

I love distressed cards - they are quick and fun to make.

Tuesday, July 14, 2009

New Hero Arts Site & Blog

You must visit the new Hero arts Stamping site - open on Wednesday. They have a great blog which I frequent often and run weekly challenges with great product giveaways. Visit this week for extra prizes and get inspired!

Saturday, July 11, 2009

Happy Birthday Butterfly Window Card


This card was handstamped using Craft Creations E17 Butterfly, Kaiser Flourishes and Stamp-it 552D Happy Birthday stamps.


  • Cut 2 pieces of acetate 8cm square and stamp the butterfly onto the centre of each using a Black Staz-on Ink Pad.

  • Stick one of the acetate butterflies over the window of the 14cm square white window card. Cut out the other butterfly image.

  • Stamp and emboss with white ink and white embossing powder the flourish on the top left corner of a Bright blue overlay window.

  • Using double sided tape, stick on a pretty blue ribbon vertically along the left side of the overlay and also horizontally along the bottom of the blue overlay. Fold over the edge of the overlay for a neat finish. Refer to the pics for placement.

  • Centre a flower brad where the two ribbons cross.

  • Stamp and emboss Happy Birthday with black ink and clear embossing powder onto a scrap of YES card. Trim and colour the edge with a matching blue marker. Secure to the blue overlay with double sided tape.

  • Centre the blue overlay on the front of the 14cm square white window card and stick in place with double sided tape.

  • Take the cut out acetate butterfly you put aside earlier and fold at the body. Stick the fold line to the body of other butterfly in the window with 3mm double sided tape.

  • Add an insert to the card and you are done.

You can purchase your supplies for this card in our store.


Thanks A Bunch Thankyou Card


This card was handstamped using Hero Arts H1107 Sunflower Gal and Stamp-it 849C Thanks A Bunch stamps.

  • Stamp and emboss in black the Sunflower Gal stamp onto a 7x9.5cm piece of YES card. Stamp and emboss in black again onto a piece of scrap YES card.

  • Colour the complete image on the 7x9.5cm card with tombow pens and a blender, then colour just the sunflowers of the second image stamped onto the scrap.

  • Cut out the coloured sunflowers and mount them with magic mount onto the complete image on the 7x9.5cm card.
    Stamp Thanks a Bunch with a Walnut Distress Ink Pad onto a Pre-cut Small Tag.

  • Cut a piece of pale blue card to 9.5x13.5cm.

  • Distress the edges of the pre-cut tag, the pale blue card and the YES card by rubbing the edges along the Walnut Distress Ink Pad.

  • Tie some jute string to the tag.

  • Using double sided tape, stick all pieces to a plain cream base card - see pictures for placement.


Designed by Simply Fabulous Blogger Templates